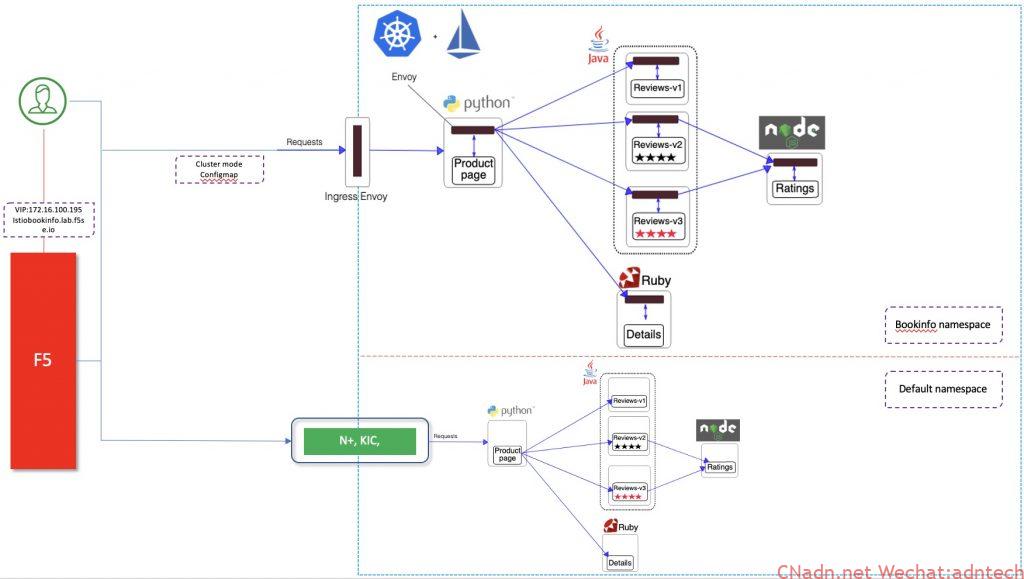
在Istio体系下,为了保证策略协调与体验的统一性,用户会考虑使用Istio自身的Ingressgateway作为南北流量的入口, ingressgateway一般是通过deployment方式部署多个pods,分散在集群的多个node上,取决于具体的暴露type,特别是在on-prem部署下,仍然需要在k8s集群外部部署相关负载均衡器来对这些ingressgateway进行负载均衡,一方面可以避免多个入口带来的访问困难与运维难度,另一方面通过高性能高可靠的F5 BIGIP可为k8s集群入口流量提供更多功能控制和安全增值服务,这与Ingress controller类似。
与将普通业务svc暴露到外部BIG-IP不同,ingressgateway本身就是一个各种业务端口的集结点,它本身可能监听着很多端口,因此并不能简单的将ingressgateway作为单一一个普通的svc。本文主要阐述如何将Istio ingressgateway与BIG-IP结合增强入口业务能力。
网络结构上可能采取的方法有:
外部负载均衡器---访问到--> ingressgateway的nodeport端口
外部负载均衡器---访问到--> ingressgateway的直接endpoints端口(直达pod)
从效能上来说自然是上述第二种直达pod方式性能更好,取决于k8s集群的网络模型,如果外部与pod可直接路由或二层直连自然最简单,如果不能直接路由,那就需要基于vxlan等隧道来实现pod直达。F5 BIGIP支持二层直达、动态路由或vxlan隧道模式。详细网络部署结构参考此文,或本博客内搜索相关文章。下文我们假定F5 BIGIP已经与k8s集群实现vxlan,可直达pod。数据最终路径如下:
client-->F5BIGIP-->Istio ingressgateway pod-->endpoints
Istio Ingressgateway的底层实现是envoy,当我们通过Gateway+VirtualService资源将一个服务发布到Ingressgateway上后,Ingressgateway便会监听Gateway里指定的端口。因此一旦发布新的业务就有可能会有新的监听端口。然而我们在部署ingressgateway pod的时候并不会提前配置好所有的端口对外的映射,也就是说pod里容器监听的端口并没有在pod的deployment里做配置,不必担心,此时是可以直接访问到pod上的此监听端口的,尽管deployment里并没有预先指定该监听端口。
那么如何通过BIGIP为Ingressgateway进行负载均衡并动态发现这些新监听的服务呢,答案自然是本文所述的方案,F5 BIGIP提供了一个控制器,运行在k8s内部,将这些发生的变化自动推送到BIGIP上。由于同一个k8s svc包含有多一个端口,因此在将这个k8s svc发布到F5上时 需要注意servicePort参数的填写。具体发布过程参考以下步骤操作:
1.部署Istio Gateway+VirtualService 资源
2.编辑已有的Ingressgateway对应的k8s svc,增加新的port与target port配置
3.配置新的F5 configmap资源,指定对应的servicePort 对新的业务进行发布
DEMO:
1.首先查看已有的Ingressgateway pod端口如下, 容器端口里没有暴露32400端口
|
1 2 3 4 5 6 7 8 9 10 11 12 13 14 15 16 17 18 19 20 21 22 23 |
name: istio-proxy ports: - containerPort: 15020 protocol: TCP - containerPort: 8080 protocol: TCP - containerPort: 8443 protocol: TCP - containerPort: 31400 protocol: TCP - containerPort: 15443 protocol: TCP - containerPort: 15011 protocol: TCP - containerPort: 15012 protocol: TCP - containerPort: 8060 protocol: TCP - containerPort: 853 protocol: TCP - containerPort: 15090 name: http-envoy-prom protocol: TCP |
2. 部署Istio Gateway与VirtualService
|
1 2 3 4 5 6 7 8 9 10 11 12 13 14 15 16 17 18 19 20 21 22 23 24 25 26 27 28 29 30 31 32 33 34 35 36 37 38 39 40 41 42 43 44 45 46 47 |
apiVersion: networking.istio.io/v1alpha3 kind: Gateway metadata: name: tcp-echo-gateway spec: selector: istio: ingressgateway servers: - port: number: 32400 name: tcp protocol: TCP hosts: - "*" --- apiVersion: networking.istio.io/v1alpha3 kind: DestinationRule metadata: name: tcp-echo-destination spec: host: tcp-echo subsets: - name: v1 labels: version: v1 - name: v2 labels: version: v2 --- apiVersion: networking.istio.io/v1alpha3 kind: VirtualService metadata: name: tcp-echo spec: hosts: - "*" gateways: - tcp-echo-gateway tcp: - match: - port: 32400 ###########32400端口监听 route: - destination: host: tcp-echo port: number: 9000 subset: v1 |
3. 部署完毕后,查看envoy,确认监听已下发
|
1 2 3 4 5 6 7 8 9 10 11 12 13 14 15 16 17 18 19 20 21 22 23 24 25 26 27 28 |
{ "name": "0.0.0.0_32400", "address": { "socketAddress": { "address": "0.0.0.0", "portValue": 32400 } }, "filterChains": [ { "filters": [ 。。。。。。。。。。省略。。。。。。。。。。 { "name": "envoy.tcp_proxy", "typedConfig": { "@type": 。。。。。 "cluster": "outbound|9000|v1|tcp-echo.istio-io-tcp-traffic-shifting.svc.cluster.local", 。。。。。 } } ] } ], "trafficDirection": "OUTBOUND" }, |
4.修改现有的Ingressgateway的svc,增加32400端口的对外暴露
|
1 2 3 4 5 6 7 8 9 10 11 12 13 14 15 16 17 18 19 20 21 22 23 24 25 26 27 28 29 30 31 32 33 34 35 36 37 38 39 40 41 42 43 44 45 46 47 48 49 50 51 52 53 54 55 56 57 58 59 60 61 62 63 64 65 66 67 68 69 70 71 72 73 74 75 76 77 78 79 80 81 82 83 84 |
kubectl edit svc istio-ingressgateway -n istio-system -o yaml 修改前: ports: - name: status-port nodePort: 31702 port: 15020 protocol: TCP targetPort: 15020 - name: http2 nodePort: 31547 port: 80 protocol: TCP targetPort: 8080 - name: https nodePort: 31956 port: 443 protocol: TCP targetPort: 8443 - name: tcp nodePort: 30775 port: 31400 protocol: TCP targetPort: 31400 - name: tls nodePort: 30536 port: 15443 protocol: TCP targetPort: 15443 selector: app: istio-ingressgateway istio: ingressgateway sessionAffinity: None type: LoadBalancer 修改后: ports: - name: status-port nodePort: 31702 port: 15020 protocol: TCP targetPort: 15020 - name: http2 nodePort: 31547 port: 80 protocol: TCP targetPort: 8080 - name: https nodePort: 31956 port: 443 protocol: TCP targetPort: 8443 - name: tcp nodePort: 30775 port: 31400 protocol: TCP targetPort: 31400 - name: tcp2 nodePort: 30776 port: 32400 protocol: TCP targetPort: 32400 #########新增端口 - name: tls nodePort: 30536 port: 15443 protocol: TCP targetPort: 15443 [root@k8s-master-v1-16 ~]# kubectl get svc -n istio-system NAME TYPE CLUSTER-IP EXTERNAL-IP PORT(S) AGE grafana ClusterIP 10.96.165.101 <none> 3000/TCP 2d istio-egressgateway ClusterIP 10.110.88.185 <none> 80/TCP,443/TCP,15443/TCP 2d istio-ingressgateway LoadBalancer 10.96.122.225 <pending> 15020:31702/TCP,80:31547/TCP,443:31956/TCP,31400:30775/TCP,32400:30776/TCP,15443:30536/TCP 2d istiod ClusterIP 10.102.252.88 <none> 15010/TCP,15012/TCP,443/TCP,15014/TCP,53/UDP,853/TCP 2d jaeger-agent ClusterIP None <none> 5775/UDP,6831/UDP,6832/UDP 2d jaeger-collector ClusterIP 10.105.130.171 <none> 14267/TCP,14268/TCP,14250/TCP 2d jaeger-collector-headless ClusterIP None <none> 14250/TCP 2d jaeger-query ClusterIP 10.99.139.251 <none> 16686/TCP 2d kiali ClusterIP 10.101.189.237 <none> 20001/TCP 2d prometheus ClusterIP 10.109.157.108 <none> 9090/TCP 2d tracing ClusterIP 10.101.62.56 <none> 80/TCP 2d zipkin ClusterIP 10.98.181.246 <none> 9411/TCP |
5. 将32400 servicePort发布到F5上,此时需要新增一个F5 configmap,注意其中的中文注释
|
1 2 3 4 5 6 7 8 9 10 11 12 13 14 15 16 17 18 19 20 21 22 23 24 25 26 27 28 29 30 |
kind: ConfigMap apiVersion: v1 metadata: name: istio-ingressgateway.32400.vs namespace: istio-system labels: f5type: virtual-server data: # See the f5-schema table for schema-controller compatibility # https://clouddocs.f5.com/containers/latest/releases_and_versioning.html#f5-schema schema: "f5schemadb://bigip-virtual-server_v0.1.7.json" data: | { "virtualServer": { "backend": { "serviceName": "istio-ingressgateway", "servicePort": 32400 ####这里很重要,这里填写的是对应的k8s svc的port,F5 CIS 控制器将自动发现该servicePort对应的targetPort(CIS cluster模式)或 nodeport(CIS nodeport模式) }, "frontend": { "virtualAddress": { "port": 31400, "bindAddr": "172.16.100.195" }, "partition": "k8s", "balance": "least-connections-member", "mode": "tcp" } } } |
F5上将自动产生如下红框中的配置:
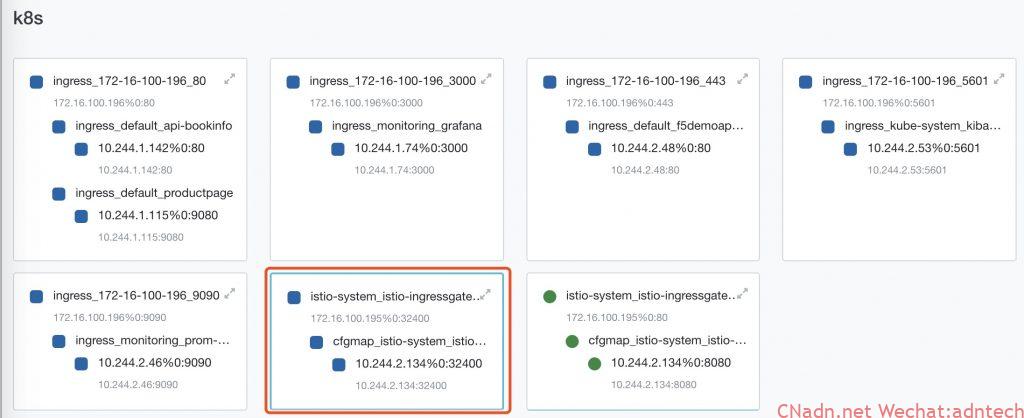
从外部模拟访问业务,可以看到可以正常访问
|
1 2 3 4 5 |
# jlin @ Mac in ~ [myf5.net] $ for i in {1..2000}; do (date; sleep 1) | nc istiobookinfo.lab.f5se.io 32400; done one Mon Jun 22 22:24:17 CST 2020 one Mon Jun 22 22:24:18 CST 2020 one Mon Jun 22 22:24:19 CST 2020 |
至此,Istio Ingressgateway上新发布的业务监听被成功的自动发布到BIGIP上,用户只需通过访问BIGIP的VS即可实现对k8s内(Istio Ingressgateway上)的服务访问。
对于后续其它新端口业务的发布,重复上述步骤即可。
注意:上述配置中采用的是非F5 AS3 configmap配置方法,如果是采用CIS 2.0需要注意这个 issue


文章评论