In this multi-part blog series I intend to dive into the various components of the OpenStack Neutron project, and to also provide working examples of networking configurations for clouds built with Rackspace Private Cloud powered by OpenStackon Ubuntu 12.04 LTS.
In the previous installment, Neutron Networking: Simple Flat Network, I demonstrated an easy method of providing connectivity to instances using an untagged flat network. In this third installment, I’ll describe how to build multiple provider networks using 802.1q vlan tagging.<!-- more -->
Getting Started / VLAN vs Flat Design
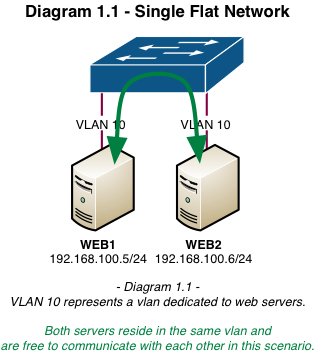
One of the negative aspects of a flat network is that it’s one large broadcast domain. Virtual Local Area Networks, or VLANs, aim to solve this problem by creating smaller, more manageable broadcast domains. From a security standpoint, flat networks provide malicious users the potential to see the entire network from a single host.
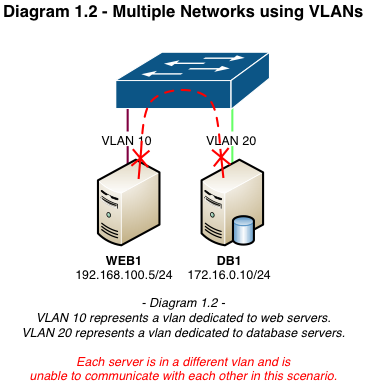
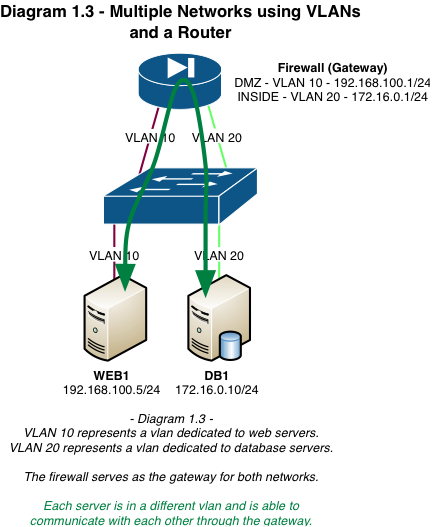
VLAN segregation is often used in a web hosting environment where there’s one vlan for web servers (DMZ) and another for database servers (INSIDE). Neither network can communicate directly without a routing device to route between them. With proper security mechanisms in place, if a server becomes compromised in the DMZ it does not have the ability to determine or access the resources in the INSIDE vlan.
The diagrams below are examples of traditional flat and vlan-segregated networks:
VLAN Tagging / What is it and how does it work?
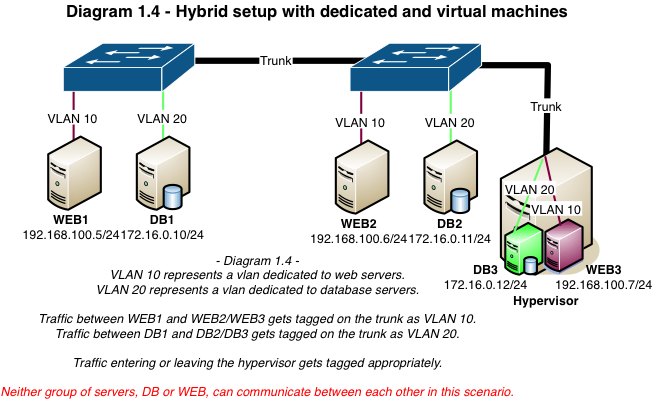
At a basic level on a Cisco switch there are two types of switchports: access ports and trunk ports. Switchports configured as access ports are placed into a single vlan and can communicate with other switchports in the same vlan. Switchports configured as trunks allow traffic from multiple vlans to traverse a single interface. The switch adds a tag to the Ethernet frame that contains the corresponding vlan ID as the frame enters the trunk. As the frame exits the trunk on the other side, the vlan tag is stripped and the traffic forwarded to its destination. Common uses of trunk ports include uplinks to other switches and more importantly in our case, hypervisors serving virtual machines from various networks.
VLAN Tagging / How does this apply to Neutron?
In the previous installment I discussed flat networks and their lack of vlan tagging. All hosts in the environment were connected to access ports in the same vlan, thereby allowing hosts and instances to communicate with one another on the same network. VLANs allow us to not only separate host and instance traffic, but to also create multiple networks for instances similar to the DMZ and INSIDE scenarios above.
Neutron allows users to create multiple provider or tenant networks using vlan IDs that correspond to real vlans in the data center. A single OVS bridge can be utilized by multiple provider and tenant networks using different vlan IDs, allowing instances to communicate with other instances across the environment, and also with dedicated servers, firewalls, load balancers and other networking gear on the same Layer 2 vlan.
Networking / Layout
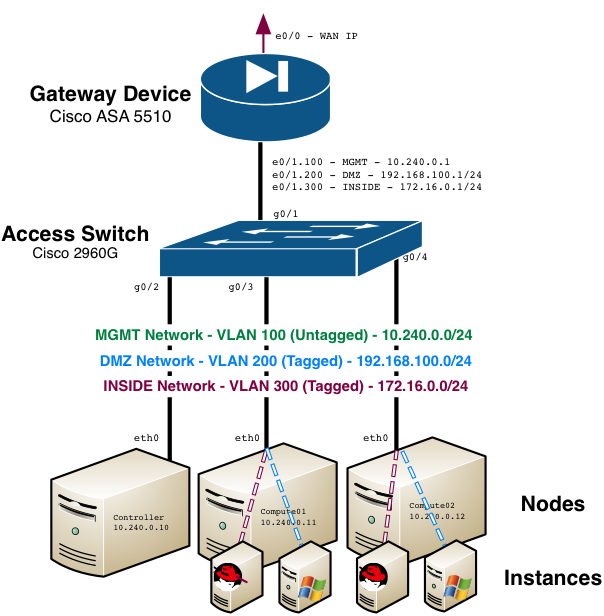
For this installment, a Cisco ASA 5510 will once again serve as the lead gateway device. In fact, I’ll be building upon the configuration already in place from the flat networking demonstration in the previous installment. 10.240.0.0/24 will continue to serve as the management network for hosts and the flat provider network, and two new provider networks will be created:
- VLAN 100 - MGMT - 10.240.0.0/24 (Existing)
- VLAN 200 – DMZ – 192.168.100.0/24 (NEW)
- VLAN 300 – INSIDE – 172.16.0.0/24 (NEW)
A single interface on the servers will be used for both management and provider network connectivity.
Networking / Configuration of Network Devices
The Cisco ASA was chosen for this example since it’s readily available at my location. Interface e0/0 should be configured with your WAN IP. Interface e0/1 will be split into sub-interfaces in my example, but you can leverage separate interfaces if you’ve got them. e0/1.100 must be configured with an IP address that will serve as the gateway for hosts and instances using the flat provider network:
|
1 2 3 4 5 6 7 8 9 10 11 12 13 |
interface Ethernet0/1 no ip address no security-level speed 100 duplex full no nameif interface Ethernet0/1.100 vlan 100 nameif mgmt security-level 100 ip address 10.240.0.1 255.255.255.0 |
e0/1.200 and e0/1.300 will be utilized for the new INSIDE and DMZ vlans, respectively:
|
1 2 3 4 5 6 7 8 9 10 11 12 13 |
interface Ethernet0/1.200 vlan 200 nameif inside security-level 100 ip address 192.168.100.1 255.255.255.0 interface Ethernet0/1.300 vlan 300 nameif dmz security-level 100 ip address 172.16.0.1 255.255.255.0 |
Based on the diagram above, the firewall’s switchport configuration may look something like this:
|
1 2 3 4 5 6 7 8 9 |
interface GigabitEthernet0/1 switchport trunk allowed vlan 100,200,300 switchport mode trunk speed 100 duplex full no cdp enable spanning-tree portfast end |
Server switchports will look similar, but vlan 100 will need to be the native vlan (untagged) due to its use as both a flat provider network and the management network:
|
1 2 3 4 5 6 7 8 9 10 |
interface GigabitEthernet0/1 switchport trunk allowed vlan 100,200,300 switchport trunk native vlan 100 switchport mode trunk speed 100 duplex full no cdp enable spanning-tree portfast end |
Networking / Configuration of Servers
If you followed the previous installment and successfully configured a bridge in OVS and a flat provider network, the proper server network configuration should already be in place. If you haven’t, there’s a good chance your servers have their IP configured directly on eth0. To utilize Neutron, the hosts must have a network bridge configured. This can be accomplished one of two ways:
- Utilize a single interface for both management of the hosts and the network bridge
- Utilize one interface for management of the hosts, and another for the network bridge(s)
For this example, I’ll use a single interface and move the IP address from eth0 to the bridge.
Below is what a default eth0 configuration might look like:
|
1 2 3 4 5 6 7 |
auto eth0 iface eth0 inet static address 10.240.0.10 netmask 255.255.255.0 gateway 10.240.0.1 nameserver 8.8.8.8 |
In order to configure the bridge, eth0 must be modified and the bridge interface configured:
|
1 2 3 4 5 6 7 8 9 10 11 |
auto eth0 iface eth0 inet manual up ip l s $IFACE up down ip l s $IFACE down iface br-eth0 inet static address 10.240.0.10 netmask 255.255.255.0 gateway 10.240.0.1 nameserver 8.8.8.8 |
TIP: Do not set br-eth0 to auto. Because of the order that processes are started at boot, the interface must be brought up using rc.local. Instead, edit the /etc/rc.local file of each machine and add the following line before the 'exit 0' statement:
|
1 2 |
ifup br-eth0 |
Networking / Open vSwitch Configuration
Creating the network bridge in Open vSwitch is a requirement for proper management of traffic. The previous installment covered this, so it may not be necessary to configure if it’s still in place.
The following will create a bridge called ‘br-eth0’ and place physical interface eth0 inside:
|
1 2 3 |
ovs-vsctl add-br br-eth0 ovs-vsctl add-port br-eth0 eth0 |
The creation and configuration of the bridge enables the instances to communicate on the network. At a minimum, bridges must be configured on the compute and network nodes. Since we're running the network services on the controller instead of using a dedicated network node, the compute and controller nodes should have the bridge configured.
Changes to Environment (RPC v4)
When using RPC v4, most configuration changes are handled via Chef. A few changes must be made to the environment file to utilize the bridge for Neutron networking. If using RPC v4.2 (Havana), all quantum references should be changed to neutron.
|
1 2 |
knife environment edit grizzly |
Look for the section 'quantum : ovs : provider_networks'
|
1 2 3 4 |
"quantum": { "ovs": { "provider_networks": |
The bridge configuration should be modified to mirror the following example, if it doesn't already exist:
|
1 2 3 4 5 6 |
{ "label": "ph-eth0", "bridge": "br-eth0", "vlans": "" } |
The “vlans” value above represents a range of vlans available for the automatic provisioning of vlan segmentation IDs to networks created in Neutron. A range of IDs isn’t necessary if the intent is to always pass an ID manually with the net-create command. If you’d prefer Neutron to handle the ID assignment automatically, which includes networks created through Horizon, the “vlans” value can be modified appropriately:
|
1 2 3 4 5 6 |
{ "label": "ph-eth0", "bridge": "br-eth0", "vlans": "200:200,300:300" } |
In the above example, only vlans 200 and 300 are available for automatic assignment. Non-contiguous vlan ranges can be specified and separated by commas. Neutron will assign the next available ID from the list when a segmentation ID is not passed in the net-create command.
The label ‘ph-eth0’ represents our provider interface, in this case the bridge ‘br-eth0’. It will be used during the creation of networks in Neutron.
The resulting file would look something like this:
|
1 2 3 4 5 6 7 8 9 10 11 12 13 14 15 16 17 18 19 20 21 22 23 24 25 26 27 28 29 30 31 32 33 34 35 36 37 38 39 |
{ "name": "grizzly", "description": "", "cookbook_versions": { }, "json_class": "Chef::Environment", "chef_type": "environment", "default_attributes": { }, "override_attributes": { "nova": { "network": { "provider": "quantum" } }, "quantum": { "ovs": { "provider_networks": [ { "label": "ph-eth0", "bridge": "br-eth0", "vlans":”200:200,300:300" } ], "network_type": "gre" } }, "mysql": { "allow_remote_root": true, "root_network_acl": "%" }, "osops_networks": { "nova": "10.240.0.0/24", "public": "10.240.0.0/24", "management": "10.240.0.0/24" } } } |
Save the changes to the file and run chef-client on all the hosts to populate the changes.
Changes to Environment (Other)
When using something other than RPC v4, such as the vanilla OpenStack, configuration changes must be made to the appropriate configuration files and services restarted manually.
Within /etc/quantum/plugins/openvswitch/ovsquantumplugin.ini, update the following values:
|
1 2 3 4 5 6 7 8 9 |
[OVS] tenant_network_type = gre integration_bridge = br-int enable_tunneling = True tunnel_bridge = br-tun tunnel_id_ranges = 1:1000 network_vlan_ranges = ph-eth0:200:200,ph-eth0:300:300 bridge_mappings = ph-eth0:br-eth0 |
The label ‘ph-eth0’ represents the provider bridge, in this case the bridge ‘br-eth0’. It will be used during the creation of networks in Neutron. It’s possible to have more than one provider bridge, especially when you have multiple switching infrastructures for various networks and services. Restart all Neutron and Open vSwitch services on all hosts for the changes to take effect.
Networking / OVS Confirmation
Remember the bridge (br-eth0) we created in OVS earlier? At a high level, it can be looked at as our bridge to the physical network infrastructure. Neutron requires an ‘Integration Bridge’ that serves as the bridge to our virtual instances. The integration bridge connects vNICs and Neutron DHCP and L3 agents with virtual networks. Overriding the default value of ‘br-int’ is not recommended, as the bridge must be named the same on each host (controller/network/compute). RPC v4 creates this bridge during the chef-client run.
|
1 2 3 4 5 6 7 8 9 10 11 12 13 14 15 16 |
[root@controller01 ~]# ovs-vsctl show Bridge "br-eth0" Port "eth0" Interface "eth0" Port "phy-br-eth0" Interface "phy-br-eth0" Port "br-eth0" Interface "br-eth0" type: internal Bridge br-int Port br-int Interface br-int type: internal Port "int-br-eth0" Interface "int-br-eth0" |
For those installing from source, the name of the bridge is defined in /etc/quantum/plugins/openvswitch/ovsquantumplugin.ini:
|
1 2 3 |
[OVS] integration_bridge = br-int |
The bridge will need to be created manually in OVS if you are not using Chef:
|
1 2 |
ovs-vsctl add-br br-int |
Networking / Building a vlan provider network in Neutron
With the network devices and OVS configured, it’s time to build a vlan provider network in Neutron. Creating a vlan provider network requires at least two values: the name of the network and the provider bridge label. However, I recommend specifying the vlan segmentation ID to ensure parity with the infrastructure that was previously configured.
Syntax:quantum net-create --provider:physical_network=<provider label> --provider:network_type=vlan –provider:segmentation_id=<vlan id> <network name>
|
1 2 3 4 5 6 7 8 9 10 11 12 13 14 15 16 17 18 19 20 21 22 23 24 25 26 27 28 29 30 31 32 33 34 35 36 37 38 39 40 |
root@controller01:~# quantum net-create --provider:physical_network=ph-eth0 --provider:network_type=vlan --provider:segmentation_id=200 --shared INSIDE_NET Created a new network: +---------------------------+--------------------------------------+ | Field | Value | +---------------------------+--------------------------------------+ | admin_state_up | True | | id | ce316486-9c19-4c37-983b-e058cdcbd7fb | | name | INSIDE_VLAN | | provider:network_type | vlan | | provider:physical_network | ph-eth0 | | provider:segmentation_id | 200 | | router:external | False | | shared | True | | status | ACTIVE | | subnets | | | tenant_id | 30037ac916824dc1882d930407ab7e33 | +---------------------------+--------------------------------------+ root@controller01:~# quantum net-create --provider:physical_network=ph-eth0 --provider:network_type=vlan --provider:segmentation_id=300 --shared DMZ_NET Created a new network: +---------------------------+--------------------------------------+ | Field | Value | +---------------------------+--------------------------------------+ | admin_state_up | True | | id | cc1c6a8d-7023-40a3-b1a7-5bbf1c2e0702 | | name | DMZ_VLAN | | provider:network_type | vlan | | provider:physical_network | ph-eth0 | | provider:segmentation_id | 300 | | router:external | False | | shared | True | | status | ACTIVE | | subnets | | | tenant_id | 30037ac916824dc1882d930407ab7e33 | +---------------------------+--------------------------------------+ |
With the two networks created, it’s time to create the subnets.
Syntax:quantum subnet-create <network_name> <subnet> --name <subnet_name> --no-gateway --host-route destination=<dest_network>,nexthop=<nexthop_ip> --allocation-pool start=<dhcp_start_ip>,end=<dhcp_end_ip> --dns-nameservers list=true <dns_1> <dns_2>
It’s a good idea to provide values for the following options:
|
1 2 3 4 5 |
--no-gateway Instructs Quantum not to provide a gateway IP. --host-route Provides route injection via DHCP. --allocation-pool Defines the DHCP IP pool boundaries --dns-nameservers Defines DNS servers |
When a gateway is defined, Neutron assumes all metadata routes are handled by the specified gateway and will not inject the metadata route via DHCP to instances. By specifying the --nogateway flag and defining a default route manually, we’re able to provide instances with a default route as well as an automatic metadata route to the namespace IP._
|
1 2 3 4 5 6 7 8 9 10 11 12 13 14 15 16 17 18 19 20 21 22 23 24 25 26 27 28 29 30 31 32 33 34 35 36 37 38 39 40 41 42 43 44 |
root@controller01:~# quantum subnet-create INSIDE_NET 192.168.100.0/24 --name INSIDE_SUBNET --no-gateway --host-route destination=0.0.0.0/0,nexthop=192.168.100.1 --allocation-pool start=192.168.100.100,end=192.168.100.199 --dns-nameservers list=true 8.8.8.7 8.8.8.8 Created a new subnet: +------------------+----------------------------------------------------------+ | Field | Value | +------------------+----------------------------------------------------------+ | allocation_pools | {"start": "192.168.100.100", "end": "192.168.100.199"} | | cidr | 192.168.100.0/24 | | dns_nameservers | 8.8.8.7 | | | 8.8.8.8 | | enable_dhcp | True | | gateway_ip | | | host_routes | {"destination": "0.0.0.0/0", "nexthop": "192.168.100.1"} | | id | 059ef6be-59f4-4798-a183-6c40b13f63f3 | | ip_version | 4 | | name | INSIDE_SUBNET | | network_id | ce316486-9c19-4c37-983b-e058cdcbd7fb | | tenant_id | 30037ac916824dc1882d930407ab7e33 | +------------------+----------------------------------------------------------+ root@controller01:~# quantum subnet-create DMZ_NET 172.16.0.0/24 --name DMZ_SUBNET --no-gateway --host-route destination=0.0.0.0/0,nexthop=172.16.0.1 --allocation-pool start=172.16.0.100,end=172.16.0.199 --dns-nameservers list=true 8.8.8.7 8.8.8.8 Created a new subnet: +------------------+-------------------------------------------------------+ | Field | Value | +------------------+-------------------------------------------------------+ | allocation_pools | {"start": "172.16.0.100", "end": "172.16.0.199"} | | cidr | 172.16.0.0/24 | | dns_nameservers | 8.8.8.7 | | | 8.8.8.8 | | enable_dhcp | True | | gateway_ip | | | host_routes | {"destination": "0.0.0.0/0", "nexthop": "172.16.0.1"} | | id | 7ecedb05-70eb-4c32-98c0-bdb01b165db3 | | ip_version | 4 | | name | DMZ_SUBNET | | network_id | cc1c6a8d-7023-40a3-b1a7-5bbf1c2e0702 | | tenant_id | 30037ac916824dc1882d930407ab7e33 | +------------------+-------------------------------------------------------+ |
Networking / Testing Connectivity
Now that the networks have been built in Neutron, it’s time to test connectivity by spinning up some instances. Like the hosts, my instances are running Ubuntu 12.04 LTS.
|
1 2 3 4 5 6 7 8 9 10 11 12 13 14 15 16 17 18 19 20 21 22 23 24 25 26 27 28 29 30 31 32 33 34 35 36 37 38 39 40 41 42 43 44 45 46 47 48 49 50 51 52 53 54 55 56 57 58 59 60 61 62 63 64 65 66 67 68 69 70 71 72 73 74 75 76 77 78 79 80 81 82 83 84 85 86 87 88 89 90 91 92 93 94 95 96 97 98 99 100 101 102 103 104 105 106 107 108 109 110 111 112 113 114 115 116 117 118 119 120 121 122 123 124 125 126 127 128 129 130 131 132 133 134 135 136 |
root@controller01:~# nova boot --flavor=m1.small --key_name=controller-id_rsa --image=3ee2e7d5-9d7a-4650-8f76-f8ad58a8c464 --nic net-id=ce316486-9c19-4c37-983b-e058cdcbd7fb INSIDE_INSTANCE +-------------------------------------+--------------------------------------+ | Property | Value | +-------------------------------------+--------------------------------------+ | status | BUILD | | updated | 2013-11-19T14:27:38Z | | OS-EXT-STS:task_state | scheduling | | OS-EXT-SRV-ATTR:host | None | | key_name | controller-id_rsa | | image | Ubuntu 12.04.1 Precise (cloudimg) | | hostId | | | OS-EXT-STS:vm_state | building | | OS-EXT-SRV-ATTR:instance_name | instance-0000011b | | OS-EXT-SRV-ATTR:hypervisor_hostname | None | | flavor | m1.small | | id | 47b58f4c-6a0b-4e4c-b33d-6468acd275a8 | | security_groups | [{u'name': u'default'}] | | user_id | 5b585fbd6d1747f89b4bff8995b9c441 | | name | INSIDE_INSTANCE | | adminPass | r2nXR8BqVspu | | tenant_id | 30037ac916824dc1882d930407ab7e33 | | created | 2013-11-19T14:27:38Z | | OS-DCF:diskConfig | MANUAL | | metadata | {} | | accessIPv4 | | | accessIPv6 | | | progress | 0 | | OS-EXT-STS:power_state | 0 | | OS-EXT-AZ:availability_zone | nova | | config_drive | | +-------------------------------------+--------------------------------------+ root@controller01:~# nova show INSIDE_INSTANCE +-------------------------------------+---------------------------------------------+ | Property | Value | +-------------------------------------+---------------------------------------------+ | status | ACTIVE | | updated | 2013-11-19T14:27:44Z | | OS-EXT-STS:task_state | None | | OS-EXT-SRV-ATTR:host | compute02 | | key_name | controller-id_rsa | | image | Ubuntu 12.04.1 Precise (cloudimg) (3ee2e7d5-| | hostId | 496e6f036d3d0648f6cc32568196137e18e2d60f5393| | INSIDE_NET network | 192.168.100.102 | | OS-EXT-STS:vm_state | active | | OS-EXT-SRV-ATTR:instance_name | instance-0000011b | | OS-EXT-SRV-ATTR:hypervisor_hostname | compute02.grizzly2.openstacksupport.com | | flavor | m1.small (2) | | id | 47b58f4c-6a0b-4e4c-b33d-6468acd275a8 | | security_groups | [{u'name': u'default'}] | | user_id | 5b585fbd6d1747f89b4bff8995b9c441 | | name | INSIDE_INSTANCE | | created | 2013-11-19T14:27:38Z | | tenant_id | 30037ac916824dc1882d930407ab7e33 | | OS-DCF:diskConfig | MANUAL | | metadata | {} | | accessIPv4 | | | accessIPv6 | | | progress | 0 | | OS-EXT-STS:power_state | 1 | | OS-EXT-AZ:availability_zone | nova | | config_drive | | +-------------------------------------+---------------------------------------------+ root@controller01:~# nova boot --flavor=m1.small --key_name=controller-id_rsa --image=3ee2e7d5-9d7a-4650-8f76-f8ad58a8c464 --nic net-id=cc1c6a8d-7023-40a3-b1a7-5bbf1c2e0702 DMZ_INSTANCE +-------------------------------------+--------------------------------------+ | Property | Value | +-------------------------------------+--------------------------------------+ | status | BUILD | | updated | 2013-11-19T14:28:12Z | | OS-EXT-STS:task_state | scheduling | | OS-EXT-SRV-ATTR:host | None | | key_name | controller-id_rsa | | image | Ubuntu 12.04.1 Precise (cloudimg) | | hostId | | | OS-EXT-STS:vm_state | building | | OS-EXT-SRV-ATTR:instance_name | instance-0000011d | | OS-EXT-SRV-ATTR:hypervisor_hostname | None | | flavor | m1.small | | id | fb024367-d1c9-4570-8ad5-b8eb9915b569 | | security_groups | [{u'name': u'default'}] | | user_id | 5b585fbd6d1747f89b4bff8995b9c441 | | name | DMZ_INSTANCE | | adminPass | XR98khnD2NpA | | tenant_id | 30037ac916824dc1882d930407ab7e33 | | created | 2013-11-19T14:28:12Z | | OS-DCF:diskConfig | MANUAL | | metadata | {} | | accessIPv4 | | | accessIPv6 | | | progress | 0 | | OS-EXT-STS:power_state | 0 | | OS-EXT-AZ:availability_zone | nova | | config_drive | | +-------------------------------------+--------------------------------------+ root@controller01:~# nova show DMZ_INSTANCE +-------------------------------------+---------------------------------------------+ | Property | Value | +-------------------------------------+---------------------------------------------+ | status | ACTIVE | | updated | 2013-11-19T14:28:18Z | | OS-EXT-STS:task_state | None | | OS-EXT-SRV-ATTR:host | compute02 | | key_name | controller-id_rsa | | image | Ubuntu 12.04.1 Precise (cloudimg) (3ee2e7d5-| | hostId | 496e6f036d3d0648f6cc32568196137e18e2d60f5393| | OS-EXT-STS:vm_state | active | | OS-EXT-SRV-ATTR:instance_name | instance-0000011d | | OS-EXT-SRV-ATTR:hypervisor_hostname | compute02.grizzly2.openstacksupport.com | | flavor | m1.small (2) | | id | fb024367-d1c9-4570-8ad5-b8eb9915b569 | | security_groups | [{u'name': u'default'}] | | user_id | 5b585fbd6d1747f89b4bff8995b9c441 | | name | DMZ_INSTANCE | | created | 2013-11-19T14:28:12Z | | tenant_id | 30037ac916824dc1882d930407ab7e33 | | OS-DCF:diskConfig | MANUAL | | metadata | {} | | accessIPv4 | | | accessIPv6 | | | DMZ_NET network | 172.16.0.102 | | progress | 0 | | OS-EXT-STS:power_state | 1 | | OS-EXT-AZ:availability_zone | nova | | config_drive | | +-------------------------------------+---------------------------------------------+ |
Check the Nova console logs to verify the instances received their IPs, routes and metadata. Success here indicates the instances are able to communicate with the network namespace residing on the network or controller nodes.
|
1 2 3 4 5 6 7 8 9 10 11 12 13 14 15 16 17 18 19 20 21 22 23 24 25 26 27 |
root@controller01:~# nova console-log INSIDE_INSTANCE … ci-info: lo : 1 127.0.0.1 255.0.0.0 . ci-info: eth0 : 1 192.168.100.102 255.255.255.0 fa:16:3e:6d:48:57 ci-info: route-0: 0.0.0.0 192.168.100.1 0.0.0.0 eth0 UG ci-info: route-1: 169.254.169.254 192.168.100.101 255.255.255.255 eth0 UGH ci-info: route-2: 192.168.100.0 0.0.0.0 255.255.255.0 eth0 U cloud-init start running: Tue, 19 Nov 2013 14:28:09 +0000. up 4.71 seconds … Generating public/private rsa key pair. Your identification has been saved in /etc/ssh/ssh_host_rsa_key. Your public key has been saved in /etc/ssh/ssh_host_rsa_key.pub. … root@controller01:~# nova console-log DMZ_INSTANCE … ci-info: lo : 1 127.0.0.1 255.0.0.0 . ci-info: eth0 : 1 172.16.0.102 255.255.255.0 fa:16:3e:bc:95:bb ci-info: route-0: 0.0.0.0 172.16.0.1 0.0.0.0 eth0 UG ci-info: route-1: 169.254.169.254 172.16.0.101 255.255.255.255 eth0 UGH ci-info: route-2: 172.16.0.0 0.0.0.0 255.255.255.0 eth0 U … Generating public/private rsa key pair. Your identification has been saved in /etc/ssh/ssh_host_rsa_key. Your public key has been saved in /etc/ssh/ssh_host_rsa_key.pub. … |
The ability to connect to the instances from the controller confirms that proper vlan tagging is taking place:
|
1 2 3 4 5 6 7 8 9 10 11 12 13 14 15 16 17 18 |
root@controller01:~# ssh -i .ssh/id_rsa ubuntu@172.16.0.102 The authenticity of host '172.16.0.102 (172.16.0.102)' can't be established. ECDSA key fingerprint is 83:53:ce:06:11:7e:cb:0b:2c:0a:cf:4c:c9:a8:0b:8c. Are you sure you want to continue connecting (yes/no)? yes Warning: Permanently added '172.16.0.102' (ECDSA) to the list of known hosts. Welcome to Ubuntu 12.04.2 LTS (GNU/Linux 3.2.0-49-virtual x86_64) … ubuntu@dmz-instance:~$ root@controller01:~# ssh -i .ssh/id_rsa ubuntu@192.168.100.102 The authenticity of host '192.168.100.102 (192.168.100.102)' can't be established. ECDSA key fingerprint is 5f:ef:d2:16:02:c9:4d:a5:4f:5b:f8:65:d0:fb:17:1b. Are you sure you want to continue connecting (yes/no)? yes Warning: Permanently added '192.168.100.102' (ECDSA) to the list of known hosts. Welcome to Ubuntu 12.04.2 LTS (GNU/Linux 3.2.0-49-virtual x86_64) … ubuntu@inside-instance:~$ |
Because the Cisco ASA is the gateway device, all NAT translations should be configured there to provide external connectivity to/from these instances. Neutron floating IPs cannot be used in this example as they require the use of a Neutron router.
Summary
With a limited amount of networking hardware one can create a functional private cloud based on Rackspace Private Cloudpowered by OpenStack. While the use of vlan provider networks allows for more flexibility over a ‘flat’ design, it still requires interaction with hardware routers and switches for every network and subnet that gets created. In the case where the use of the L3 agent isn’t possible or necessary, vlan-based configurations can still provide users with a secure and scalable cloud experience.
