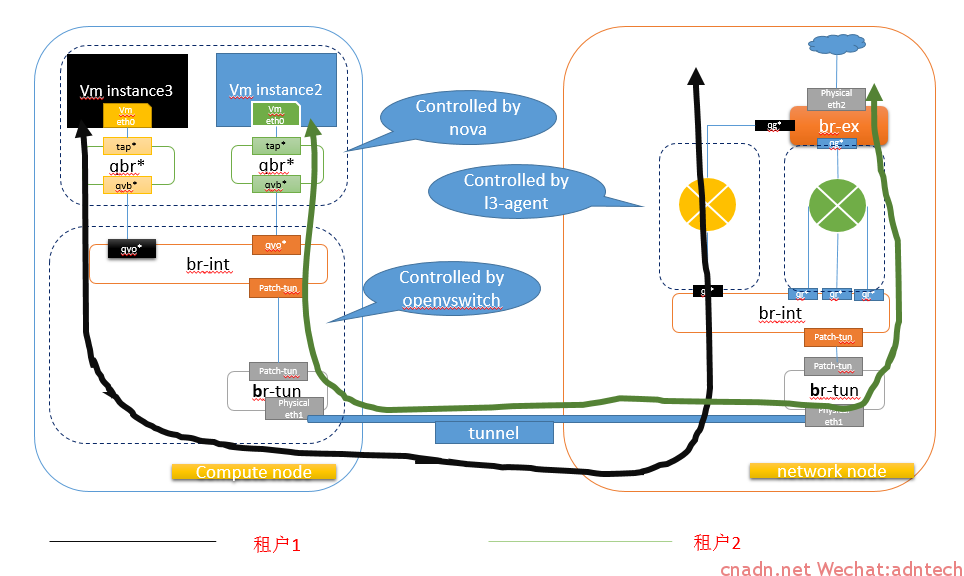
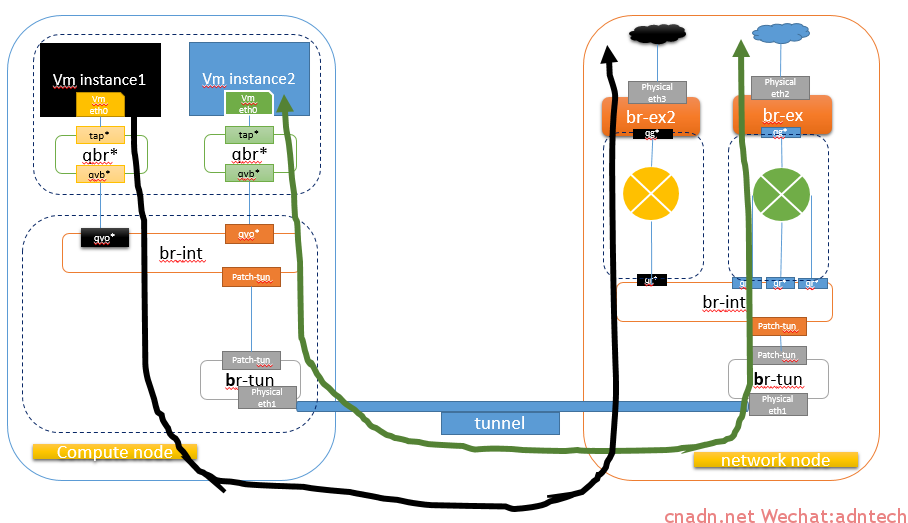
在这样的一个环境中,所有计算节点与互联网之间的通信都通过一个网络节点,且网络节点只有一个互联网线路,在实际中,往往可能涉及到多个运营商线路的接入,那么当一个网络节点需要同时与多个外部网络进行连接的话,该怎么办。
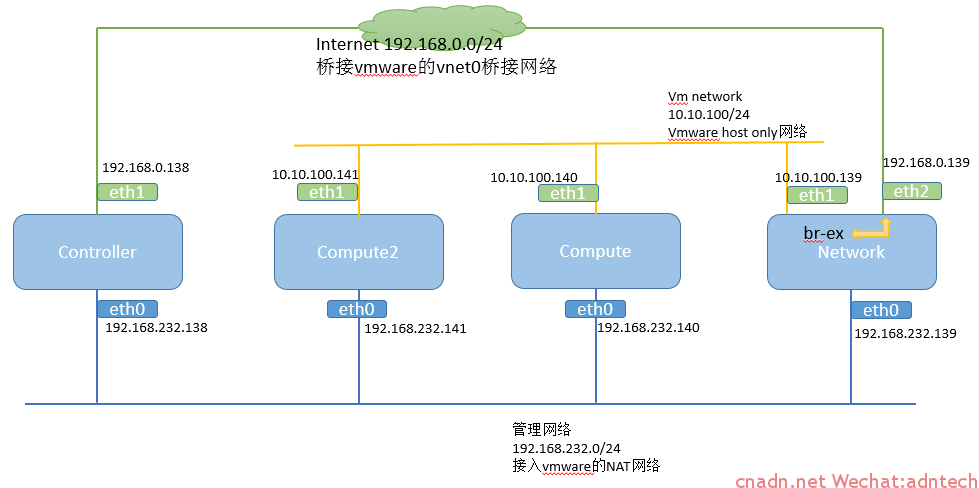
通过之前的文章,可以知道,当多个租户共享同一个网络网络时候,其结构如下:
虽然每个租户都有一个自己的虚拟路由器,但是这些虚拟路由器都最终桥接到了同一个br-ex的网桥,那么如何实现接入多个外部网络?
根据文档:http://docs.openstack.org/training-guides/content/operator-network-node.html
Multiple Floating IP Pools
The L3 API in OpenStack Networking supports multiple floating IP pools. In OpenStack Networking, a floating IP pool is represented as an external network and a floating IP is allocated from a subnet associated with the external network. Since each L3 agent can be associated with at most one external network, we need to invoke multiple L3 agent to define multiple floating IP pools. 'gateway_external_network_id'in L3 agent configuration file indicates the external network that the L3 agent handles. You can run multiple L3 agent instances on one host.
In addition, when you run multiple L3 agents, make sure that handle_internal_only_routers is set to True only for one L3 agent in an OpenStack Networking deployment and set to False for all other L3 agents. Since the default value of this parameter is True, you need to configure it carefully.
Before starting L3 agents, you need to create routers and external networks, then update the configuration files with UUID of external networks and start L3 agents.
一个l3-agent最多只能关联一个外部网络,那么当多个外部网络存在时候,则需要在该网络节点上运行多个l3-agent。所以为了实现如下多外部网络,
我们需要创建第二个l3-agent:
1. 在网络节点上使用另一物理网卡(假设为eth3)接入第二条internet线路,从openstack角度,我们称之为第二外部网络
|
1 2 3 4 5 6 7 8 9 10 11 12 13 14 15 16 17 18 19 20 21 22 23 24 25 26 27 28 29 30 31 32 33 34 35 36 37 38 39 40 41 42 43 44 45 46 47 48 |
root@network:/home/mycisco# cat /etc/network/interfaces # This file describes the network interfaces available on your system # and how to activate them. For more information, see interfaces(5). # The loopback network interface auto lo iface lo inet loopback # The primary network interface auto eth0 iface eth0 inet static address 192.168.232.139 netmask 255.255.255.0 # vm traffic auto eth1 iface eth1 inet static address 10.10.100.139 netmask 255.255.255.0 #bridge br-ex to public auto eth2 iface eth2 inet manual up ifconfig $IFACE 0.0.0.0 up up ip link set $IFACE promisc on down ip link set $IFACE promisc off down ifconfig $IFACE down auto br-ex iface br-ex inet static address 192.168.0.139 netmask 255.255.255.0 gateway 192.168.0.1 dns-nameservers 8.8.8.8 #bridge br-ex2 to public2. This is for second openstack external network auto eth3 iface eth3 inet manual up ifconfig $IFACE 0.0.0.0 up up ip link set $IFACE promisc on down ip link set $IFACE promisc off down ifconfig $IFACE down auto br-ex2 iface br-ex2 inet static address 192.168.205.139 netmask 255.255.255.0 gateway 192.168.205.1 |
2. 创建第二个网桥,br-ex2
ovs-vsctl add-br br-ex2
3. 将eth3 加入br-ex2网桥中
ovs-vsctl add-port br-ex2 eth3
4. 修改现有l3-agent.ini配置, 将已存在的第一个外部网络ID与该l3-agent关联:
|
1 2 3 4 5 6 7 8 9 10 11 12 13 14 15 16 |
root@network:/home/mycisco# neutron net-show internet +---------------------------+--------------------------------------+ | Field | Value | +---------------------------+--------------------------------------+ | admin_state_up | True | | id | bbf38334-045a-4124-859d-419e7c7abbda | | name | internet | | provider:network_type | gre | | provider:physical_network | | | provider:segmentation_id | 3 | | router:external | True | | shared | True | | status | ACTIVE | | subnets | 7b2cd216-1251-4eaa-9f05-b8cadc82bc1e | | tenant_id | 97915b10260b4fac858e4467a73eff51 | +---------------------------+--------------------------------------+ |
注意上述输出中的id,internet是已存在的外部网络name
|
1 2 3 4 5 6 7 8 |
root@network:/etc/neutron# cat l3_agent.ini | egrep -v "^#|^$" [DEFAULT] interface_driver = neutron.agent.linux.interface.OVSInterfaceDriver use_namespaces = True dhcp_driver = neutron.agent.linux.dhcp.Dnsmasq gateway_external_network_id = bbf38334-045a-4124-859d-419e7c7abbda handle_internal_only_routers = True external_network_bridge = br-ex |
* 注意handle-internal-only-routers 设置为true
5.创建第二个共享的external网络和其子网
这一步可通过horizon图形界面或直接使用neutron命令皆可,在admin租户下创建一个名叫internet2的共享的外部网络,并设置其子网为实际的外部网络子网,这里实验中的第二外部网络网段为192.168.205.0/24 ,结果如下:
|
1 2 3 4 5 6 7 8 9 10 11 12 13 14 15 16 |
root@network:/home/mycisco# neutron net-show internet2 +---------------------------+--------------------------------------+ | Field | Value | +---------------------------+--------------------------------------+ | admin_state_up | True | | id | abb31041-64ae-443c-b637-cb0d71d1d0b2 | | name | internet2 | | provider:network_type | gre | | provider:physical_network | | | provider:segmentation_id | 6 | | router:external | True | | shared | True | | status | ACTIVE | | subnets | 6c3fc82f-0e5d-45d5-87a3-13dda65516c8 | | tenant_id | 97915b10260b4fac858e4467a73eff51 | +---------------------------+--------------------------------------+ |
5.创建第二个l3-agent.ini配置,命名为l3-agent2.ini
-进入/etc/neutron,直行cp l3_agent.in l3_agent2.ini
-修改l3_agent2.ini为:
|
1 2 3 4 5 6 7 8 |
root@network:/etc/neutron# cat l3_agent2.ini |egrep -v "^#|^$" [DEFAULT] interface_driver = neutron.agent.linux.interface.OVSInterfaceDriver use_namespaces = True dhcp_driver = neutron.agent.linux.dhcp.Dnsmasq gateway_external_network_id = abb31041-64ae-443c-b637-cb0d71d1d0b2 handle_internal_only_routers = False external_network_bridge = br-ex2 |
*注意handle-internal-only-routers=false,设置network id为internet2的 ID
6.设置自启动第二个l3-agent2服务
- cd /etc/init
- cp neutron-l3-agent.conf neutron-l3-agent2.conf,并修改neutron-l3-agent2.conf为:
|
1 2 3 4 5 6 7 8 9 10 11 12 13 14 15 16 17 18 19 20 21 22 23 24 25 |
root@network:/etc/init# cat neutron-l3-agent2.conf # vim:set ft=upstart ts=2 et: description "Neutron L3 Agent2" author "Chuck Short <zulcss@ubuntu.com>" start on runlevel [2345] stop on runlevel [!2345] respawn chdir /var/run pre-start script mkdir -p /var/run/neutron chown neutron:root /var/run/neutron # Check to see if openvswitch plugin in use by checking # status of cleanup upstart configuration if status neutron-ovs-cleanup; then start wait-for-state WAIT_FOR=neutron-ovs-cleanup WAIT_STATE=running WAITER=neutron-l3-agent2 fi end script exec start-stop-daemon --start --chuid neutron --exec /usr/bin/neutron-l3-agent -- \ --config-file=/etc/neutron/neutron.conf --config-file=/etc/neutron/l3_agent2.ini \ --config-file=/etc/neutron/fwaas_driver.ini --log-file=/var/log/neutron/l3-agent2.log |
最后重启机器,确认l3-agent服务正常
|
1 2 3 4 |
root@network:/etc/init# service neutron-l3-agent status neutron-l3-agent start/running, process 5538 root@network:/etc/init# service neutron-l3-agent2 status neutron-l3-agent2 start/running, process 5727 |
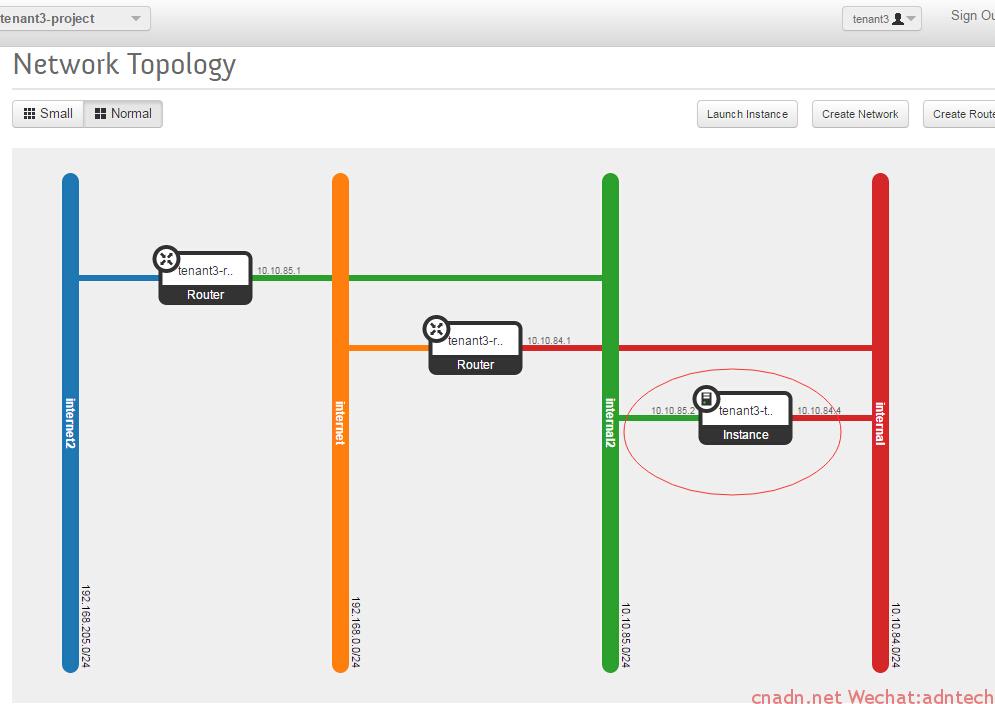
这样,openstack就将internet2网络与br-ex2进行了mapping,当一个租户的虚拟路由器将internet2作为gateway设置时,系统将自动在br-ex2中添加qg***接口。 例如,为tenant3租户创建了两个路由器,并分别关联到internet和internet2上:

|
1 2 3 4 5 6 7 8 9 10 |
Router Details Router Overview: tenant3-router-internet1 Name tenant3-router-internet1 ID a281eb4c-8829-4163-b47a-9af0ee613bb6 Status ACTIVE External Gateway Information Connected External Network: internet |
|
1 2 3 4 5 6 7 8 9 10 |
Router Details Router Overview: tenant3-router-internet2 Name tenant3-router-internet2 ID 360aa5b7-a258-4120-a95b-5fba40e9c96d Status ACTIVE External Gateway Information Connected External Network: internet2 |
上述两个路由器的namespace中接口如下:
internet路由器接口:
|
1 2 3 4 5 6 7 8 9 10 11 12 13 14 15 16 17 18 |
root@network:/etc/init# ip netns exec qrouter-a281eb4c-8829-4163-b47a-9af0ee613bb6 ifconfig lo Link encap:Local Loopback inet addr:127.0.0.1 Mask:255.0.0.0 inet6 addr: ::1/128 Scope:Host UP LOOPBACK RUNNING MTU:65536 Metric:1 RX packets:0 errors:0 dropped:0 overruns:0 frame:0 TX packets:0 errors:0 dropped:0 overruns:0 carrier:0 collisions:0 txqueuelen:0 RX bytes:0 (0.0 B) TX bytes:0 (0.0 B) qg-692bba4c-4e Link encap:Ethernet HWaddr fa:16:3e:3e:23:fa inet addr:192.168.0.11 Bcast:192.168.0.255 Mask:255.255.255.0 inet6 addr: fe80::f816:3eff:fe3e:23fa/64 Scope:Link UP BROADCAST RUNNING MTU:1500 Metric:1 RX packets:15083 errors:0 dropped:0 overruns:0 frame:0 TX packets:9 errors:0 dropped:0 overruns:0 carrier:0 collisions:0 txqueuelen:0 RX bytes:4292540 (4.2 MB) TX bytes:738 (738.0 B) |
internet2 路由器接口:
|
1 2 3 4 5 6 7 8 9 10 11 12 13 14 15 16 17 |
root@network:/etc/init# ip netns exec qrouter-360aa5b7-a258-4120-a95b-5fba40e9c96d ifconfig lo Link encap:Local Loopback inet addr:127.0.0.1 Mask:255.0.0.0 inet6 addr: ::1/128 Scope:Host UP LOOPBACK RUNNING MTU:65536 Metric:1 RX packets:0 errors:0 dropped:0 overruns:0 frame:0 TX packets:0 errors:0 dropped:0 overruns:0 carrier:0 collisions:0 txqueuelen:0 RX bytes:0 (0.0 B) TX bytes:0 (0.0 B) qg-6038b94e-bd Link encap:Ethernet HWaddr fa:16:3e:64:c6:1b inet addr:192.168.205.5 Bcast:192.168.205.255 Mask:255.255.255.0 inet6 addr: fe80::f816:3eff:fe64:c61b/64 Scope:Link UP BROADCAST RUNNING MTU:1500 Metric:1 RX packets:15155 errors:0 dropped:0 overruns:0 frame:0 TX packets:9 errors:0 dropped:0 overruns:0 carrier:0 collisions:0 txqueuelen:0 |
|
1 2 3 4 5 6 7 8 9 10 11 12 13 14 |
root@network:/etc/init# ovs-vsctl show 909c85d0-ff4e-446b-bf8a-9166f0fccd24 Bridge "br-ex2" 《《《《《《《《《《《 internet2 Port "br-ex2" Interface "br-ex2" type: internal Port "qg-6038b94e-bd" Interface "qg-6038b94e-bd" 《《《《《《《《《《《《internet2路由器接口 type: internal Port "eth3" Interface "eth3" Port "qg-2ba587e5-d4" Interface "qg-2ba587e5-d4" type: internal |
|
1 2 3 4 5 6 7 8 9 10 11 12 13 14 15 |
Bridge br-ex 《《《《《《《《《《《《《internet Port "qg-6f726a6c-41" Interface "qg-6f726a6c-41" type: internal Port "eth2" Interface "eth2" Port "qg-692bba4c-4e" Interface "qg-692bba4c-4e"《《《《《《《《《internet 路由器接口 type: internal Port br-ex Interface br-ex type: internal Port "qg-814e9e39-99" Interface "qg-814e9e39-99" type: internal |
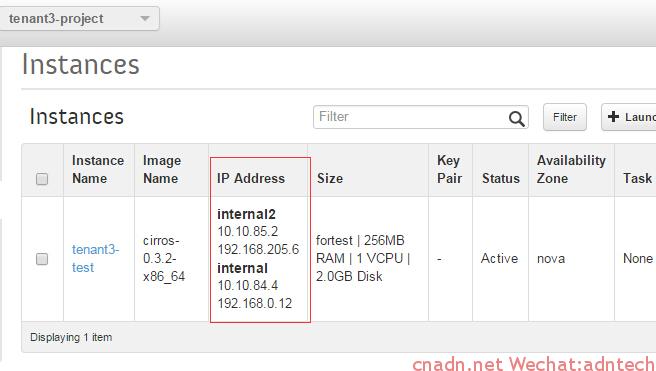
红圈中的实例通过internal和internal2 连接到了两个路由器上,形成了两个网络出口。
在各个路由器的namespace中产生了各自的nat条目:
|
1 2 3 4 5 6 7 8 9 10 11 12 13 14 15 16 17 18 19 20 21 22 23 24 25 26 27 28 29 30 31 32 33 34 35 36 37 38 39 40 41 42 43 44 45 46 47 48 49 50 51 52 53 54 55 56 57 58 59 60 61 62 63 64 65 66 67 68 69 70 71 72 73 74 75 76 77 78 79 80 81 82 83 84 85 86 87 88 89 90 91 92 93 94 95 96 97 |
root@network:/etc/init# ip netns exec qrouter-a281eb4c-8829-4163-b47a-9af0ee613bb6 iptables-save # Generated by iptables-save v1.4.21 on Sun Jan 4 11:41:11 2015 *filter :INPUT ACCEPT [2148:170256] :FORWARD ACCEPT [0:0] :OUTPUT ACCEPT [42:5724] :neutron-filter-top - [0:0] :neutron-l3-agent-FORWARD - [0:0] :neutron-l3-agent-INPUT - [0:0] :neutron-l3-agent-OUTPUT - [0:0] :neutron-l3-agent-local - [0:0] -A INPUT -j neutron-l3-agent-INPUT -A FORWARD -j neutron-filter-top -A FORWARD -j neutron-l3-agent-FORWARD -A OUTPUT -j neutron-filter-top -A OUTPUT -j neutron-l3-agent-OUTPUT -A neutron-filter-top -j neutron-l3-agent-local -A neutron-l3-agent-INPUT -d 127.0.0.1/32 -p tcp -m tcp --dport 9697 -j ACCEPT COMMIT # Completed on Sun Jan 4 11:41:11 2015 # Generated by iptables-save v1.4.21 on Sun Jan 4 11:41:11 2015 *nat :PREROUTING ACCEPT [14315:4183930] :INPUT ACCEPT [51:6294] :OUTPUT ACCEPT [0:0] :POSTROUTING ACCEPT [0:0] :neutron-l3-agent-OUTPUT - [0:0] :neutron-l3-agent-POSTROUTING - [0:0] :neutron-l3-agent-PREROUTING - [0:0] :neutron-l3-agent-float-snat - [0:0] :neutron-l3-agent-snat - [0:0] :neutron-postrouting-bottom - [0:0] -A PREROUTING -j neutron-l3-agent-PREROUTING -A OUTPUT -j neutron-l3-agent-OUTPUT -A POSTROUTING -j neutron-l3-agent-POSTROUTING -A POSTROUTING -j neutron-postrouting-bottom -A neutron-l3-agent-OUTPUT -d 192.168.0.12/32 -j DNAT --to-destination 10.10.84.4 -A neutron-l3-agent-POSTROUTING ! -i qg-692bba4c-4e ! -o qg-692bba4c-4e -m conntrack ! --ctstate DNAT -j ACCEPT -A neutron-l3-agent-PREROUTING -d 169.254.169.254/32 -p tcp -m tcp --dport 80 -j REDIRECT --to-ports 9697 -A neutron-l3-agent-PREROUTING -d 192.168.0.12/32 -j DNAT --to-destination 10.10.84.4 -A neutron-l3-agent-float-snat -s 10.10.84.4/32 -j SNAT --to-source 192.168.0.12 -A neutron-l3-agent-snat -j neutron-l3-agent-float-snat -A neutron-l3-agent-snat -s 10.10.84.0/24 -j SNAT --to-source 192.168.0.11 -A neutron-postrouting-bottom -j neutron-l3-agent-snat COMMIT # Completed on Sun Jan 4 11:41:11 2015 root@network:/etc/init# root@network:/etc/init# root@network:/etc/init# root@network:/etc/init# root@network:/etc/init# root@network:/etc/init# ip netns exec qrouter-360aa5b7-a258-4120-a95b-5fba40e9c96d iptables-save # Generated by iptables-save v1.4.21 on Sun Jan 4 11:42:12 2015 *filter :INPUT ACCEPT [2283:181564] :FORWARD ACCEPT [0:0] :OUTPUT ACCEPT [81:11244] :neutron-filter-top - [0:0] :neutron-l3-agent-FORWARD - [0:0] :neutron-l3-agent-INPUT - [0:0] :neutron-l3-agent-OUTPUT - [0:0] :neutron-l3-agent-local - [0:0] -A INPUT -j neutron-l3-agent-INPUT -A FORWARD -j neutron-filter-top -A FORWARD -j neutron-l3-agent-FORWARD -A OUTPUT -j neutron-filter-top -A OUTPUT -j neutron-l3-agent-OUTPUT -A neutron-filter-top -j neutron-l3-agent-local -A neutron-l3-agent-INPUT -d 127.0.0.1/32 -p tcp -m tcp --dport 9697 -j ACCEPT COMMIT # Completed on Sun Jan 4 11:42:12 2015 # Generated by iptables-save v1.4.21 on Sun Jan 4 11:42:12 2015 *nat :PREROUTING ACCEPT [14361:4195306] :INPUT ACCEPT [70:7827] :OUTPUT ACCEPT [0:0] :POSTROUTING ACCEPT [0:0] :neutron-l3-agent-OUTPUT - [0:0] :neutron-l3-agent-POSTROUTING - [0:0] :neutron-l3-agent-PREROUTING - [0:0] :neutron-l3-agent-float-snat - [0:0] :neutron-l3-agent-snat - [0:0] :neutron-postrouting-bottom - [0:0] -A PREROUTING -j neutron-l3-agent-PREROUTING -A OUTPUT -j neutron-l3-agent-OUTPUT -A POSTROUTING -j neutron-l3-agent-POSTROUTING -A POSTROUTING -j neutron-postrouting-bottom -A neutron-l3-agent-OUTPUT -d 192.168.205.6/32 -j DNAT --to-destination 10.10.85.2 -A neutron-l3-agent-POSTROUTING ! -i qg-6038b94e-bd ! -o qg-6038b94e-bd -m conntrack ! --ctstate DNAT -j ACCEPT -A neutron-l3-agent-PREROUTING -d 169.254.169.254/32 -p tcp -m tcp --dport 80 -j REDIRECT --to-ports 9697 -A neutron-l3-agent-PREROUTING -d 192.168.205.6/32 -j DNAT --to-destination 10.10.85.2 -A neutron-l3-agent-float-snat -s 10.10.85.2/32 -j SNAT --to-source 192.168.205.6 -A neutron-l3-agent-snat -j neutron-l3-agent-float-snat -A neutron-l3-agent-snat -s 10.10.85.0/24 -j SNAT --to-source 192.168.205.5 -A neutron-postrouting-bottom -j neutron-l3-agent-snat COMMIT # Completed on Sun Jan 4 11:42:12 2015 |
备注:
在一个网络节点上运行多个l3-agent,测试发现不是那么稳定,会出现当设置或取消路由器的gateway设置时,ovs不能对应的在正确的网桥中增加或删除相关qg*接口。
该方式依旧是在一个网络节点实现多外部网络接入,一个网络节点容易成为瓶颈,因此若考虑实现多个网络节点,每个网络节点分别接入不同的外部网络,如何实现? 待后续文章。
