上篇文章测试了haproxy作为lbaas的情形,但在应用交付领域F5这一当之无愧的老大显然不能落后,作为openstack的赞助商,F5为openstack提供了一个LBaaS的plugin,通过该plugin可以实现与openstack内外F5以及BigIQ协同。 本文记录如何安装F5 plugin以及整个测试过程。openstack的具体安装过程请见博客中前面的文章。
一、F5 LBaaS plugin的下载与安装,本文使用社区版plugin 1.0.6(F5从1.0.8plugin版本后合并社区版与offical版本)
1. 下载地址
https://devcentral.f5.com/d/openstack-neutron-lbaas-driver-and-agent
2. 下载下来的压缩包中包含很多文件,重要的readme一定要看,其次有4个安装文件,其中两个是deb安装包,另外2个是rpm包,用于对应不同的系统的安装,测试中使用Ubuntu系统,因此使用deb安装包。
二、安装及neutron配置
在控制节点上安装 driver,在网络节点上安装driver以及agent
dpkg -i ****
注意:如果安装完毕后,在/var/log/upstart/ f5-bigip-lbaas-agent.log 日志中发现出现如下类似错误的话,请安装 apt-get install python-suds
Error importing loadbalancer device driver: neutron.services.loadbalancer.drivers.f5.bigip.icontrol_driver.iControlDriver
安装完毕后,使用service f5-bigip-lbaas-agent status 观察服务是否已经启动并没有出现不停重启情况,如果有请查看对应的日志文件观察错误。
下面接着配置neutron,参考以下配置在控制以及网络节点中,修改service_plugin,service_provider
|
1 2 3 4 5 6 7 8 9 10 11 12 13 14 15 16 17 18 19 20 21 22 23 24 25 26 27 28 29 30 31 32 33 34 |
root@controller:/home/mycisco# cat /etc/neutron/neutron.conf | egrep -v "^$|^#" [DEFAULT] state_path = /var/lib/neutron lock_path = $state_path/lock core_plugin = ml2 service_plugins = router,neutron.services.loadbalancer.plugin.LoadBalancerPlugin f5_loadbalancer_pool_scheduler_driver = neutron.services.loadbalancer.drivers.f5.agent_scheduler.TenantScheduler auth_strategy = keystone allow_overlapping_ips = True rabbit_host = 192.168.232.138 rpc_backend = neutron.openstack.common.rpc.impl_kombu notification_driver = neutron.openstack.common.notifier.rpc_notifier notify_nova_on_port_status_changes = True notify_nova_on_port_data_changes = True nova_url = http://192.168.232.138:8774/v2 nova_admin_username = nova nova_admin_tenant_id = f0ef0312929d433b9b1dcc3d030d0634 nova_admin_password = service_pass nova_admin_auth_url = http://192.168.232.138:35357/v2.0 [quotas] [agent] root_helper = sudo /usr/bin/neutron-rootwrap /etc/neutron/rootwrap.conf [keystone_authtoken] auth_host = 192.168.232.138 auth_port = 35357 auth_protocol = http admin_tenant_name = service admin_user = neutron admin_password = service_pass signing_dir = $state_path/keystone-signing [database] connection = mysql://neutron:NEUTRON_DBPASS@192.168.232.138/neutron [service_providers] service_provider=LOADBALANCER:F5:neutron.services.loadbalancer.drivers.f5.plugin_driver.F5PluginDriver:default |
重启neutron服务,并验证服务正常运行
三、f5 lbaas 配置,参考以下配置,由于测试环境外部F5是独立于openstack外部的,和openstack的网络以及计算节点的用于VM实例的网络可以直接路由互通(测试中其实是直连)
|
1 2 3 4 5 6 7 8 9 10 11 12 13 14 15 16 17 18 19 20 21 22 23 24 25 26 27 |
root@network:/var/log/upstart# cd /etc/neutron/ root@network:/etc/neutron# cat f5-bigip-lbaas-agent.ini| egrep -v "^$|^#" [DEFAULT] debug = True periodic_interval = 10 static_agent_configuration_data = name1:value1, name1:value2, name3:value3 f5_device_type = external f5_ha_type = standalone f5_sync_mode = replication f5_external_physical_mappings = default:1.3:True f5_vtep_folder = 'Common' f5_vtep_selfip_name = 'vtep' advertised_tunnel_types = gre f5_populate_static_arp = True l2_population = True f5_global_routed_mode = False use_namespaces = True f5_route_domain_strictness = False f5_snat_mode = True f5_snat_addresses_per_subnet = 1 f5_common_external_networks = True f5_bigip_lbaas_device_driver = neutron.services.loadbalancer.drivers.f5.bigip.icontrol_driver.iControlDriver icontrol_hostname = 192.168.232.245 icontrol_username = admin icontrol_password = admin icontrol_connection_retry_interval = 10 icontrol_connection_timeout = 10 |
配置完毕后重启 F5 lbaas 服务并确认服务正常运行。
四、外部F5的预配置
F5的license一定要有 SDN service ,否则表面看配置都OK,实际数据不会被转发!
1. 首先provision好F5设备,并将Management (MGMT) provision为large方式
2. 配置vlan,并配置一个self ip,注意这个self ip的名字一定要和agent配置文件中指定vtep——self-ip配置项的值相同,本例是vtep
|
1 2 3 4 5 6 7 |
[root@bigip:Active:Standalone] config # tmsh list net self net self vtep { address 10.10.100.248/24 allow-service all traffic-group traffic-group-local-only vlan phy_vlan } |
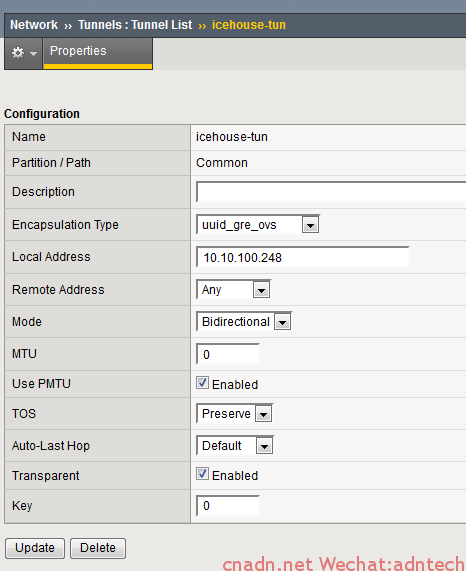
3. 配置tunnel:
五、从网络节点ping 上述self ip,确保网络连通,然后在网络节点再次重启f5 lbaas agent服务。注意如果你的F5此前有其他vs等配置,此时配置很可能一下子就被清空了,不要随便接入一台生产环境F5.
正常情况下,此时F5 agent应该已经与F5正常通信了,验证:
|
1 2 3 4 5 6 7 8 9 10 11 12 13 14 15 16 17 |
root@controller:/home/mycisco# neutron agent-list +--------------------------------------+--------------------+----------------------------------------------+-------+----------------+ | id | agent_type | host | alive | admin_state_up | +--------------------------------------+--------------------+----------------------------------------------+-------+----------------+ | 0e330cd6-5108-45e9-940f-6414a17eb636 | Open vSwitch agent | network | :-) | True | | 0e59f1c8-381c-4951-8086-535a72587510 | Open vSwitch agent | compute2 | xxx | True | | 1e4e16e0-7507-4cce-ac43-c6539028130a | Open vSwitch agent | network2 | xxx | True | | 4a9c7571-ab9f-456d-af50-5ce9486a9946 | Open vSwitch agent | compute | :-) | True | | 4c5e4a0e-df2f-4a76-80fc-a996b641fa60 | L3 agent | network2 | xxx | True | | 68ab802a-7e46-4030-8d82-aae689d9f875 | Metadata agent | network2 | xxx | True | | 800f56c4-e879-4bc2-bc5c-04605796892c | DHCP agent | network | :-) | True | | 82bc5d54-ee4d-49ee-827c-176636f71b02 | Metadata agent | network | :-) | True | | 97207b3a-0695-4927-819a-57e6fdd33189 | L3 agent | network | :-) | True | | bc2ed1a8-03b3-40ab-bf69-14346b3b6b16 | Loadbalancer agent | network | xxx | True | | c5bcad49-9732-431c-9a1d-408ad2c3f668 | DHCP agent | network2 | xxx | True | | d86a23e5-708e-4f2f-a380-6511e47eeb71 | Loadbalancer agent | network:a86da990-5113-5f2f-8704-932b3fa2813b | :-) | True | +--------------------------------------+--------------------+----------------------------------------------+-------+----------------+ |
最后一个agent就是F5的agent:
|
1 2 3 4 5 6 7 8 9 10 11 12 13 14 15 16 17 18 19 20 21 22 23 24 25 26 27 28 29 30 31 32 33 34 35 36 37 38 39 40 41 |
root@controller:/home/mycisco# neutron agent-show d86a23e5-708e-4f2f-a380-6511e47eeb71 +---------------------+-------------------------------------------------------------------+ | Field | Value | +---------------------+-------------------------------------------------------------------+ | admin_state_up | True | | agent_type | Loadbalancer agent | | alive | True | | binary | f5-bigip-lbaas-agent | | configurations | { | | | "icontrol_endpoints": { | | | "192.168.232.245": { | | | "device_name": "bigip.openstack.com", | | | "platform": "Virtual Edition", | | | "version": "BIG-IP_v11.6.0", | | | "serial_number": "564dca5d-126b-5743-fba9ee814751" | | | } | | | }, | | | "request_queue_depth": 0, | | | "tunneling_ips": [ | | | "10.10.100.248" | | | ], | | | "common_networks": {}, | | | "services": 1, | | | "name3": "value3", | | | "name1": "value2", | | | "tunnel_types": [ | | | "gre" | | | ], | | | "bridge_mappings": { | | | "default": "1.3" | | | }, | | | "global_routed_mode": false | | | } | | created_at | 2015-03-23 09:31:46 | | description | | | heartbeat_timestamp | 2015-04-23 22:25:47 | | host | network:a86da990-5113-5f2f-8704-932b3fa2813b | | id | d86a23e5-708e-4f2f-a380-6511e47eeb71 | | started_at | 2015-04-23 05:45:56 | | topic | f5_lbaas_process_on_agent | +---------------------+-------------------------------------------------------------------+ |
六、 预配置工作完成,进入horizon的LB界面开始配置LB
假设希望在下面租户的这个网络中实现t3-client(172.16.0.103机器通过F5的vip来访问10.10.40.3这个服务器)。。不要管下图中网络的命名,写错了。。。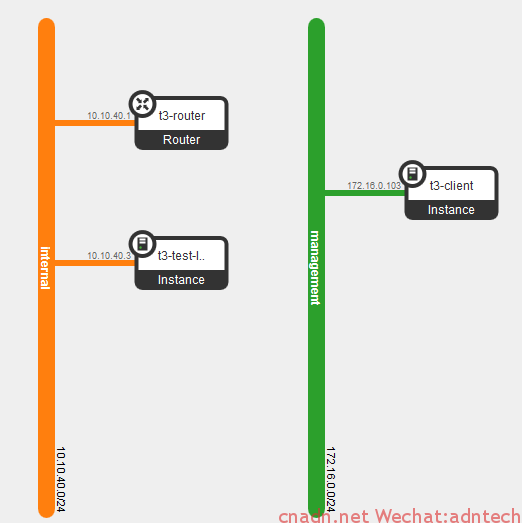
首先进入LB界面:
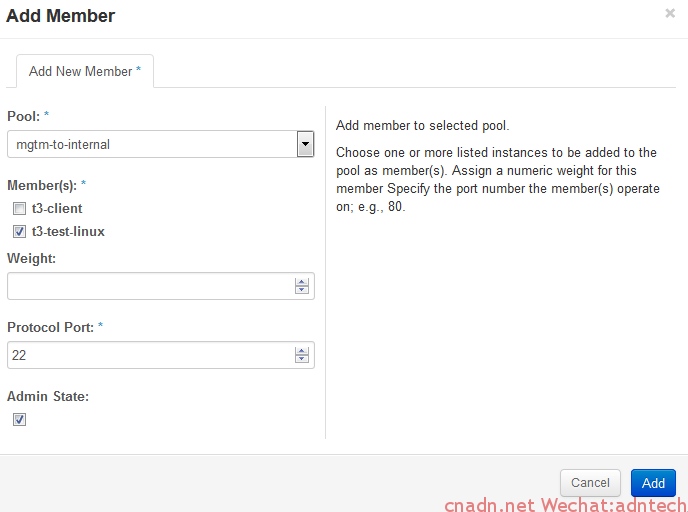
然后进入member标签:
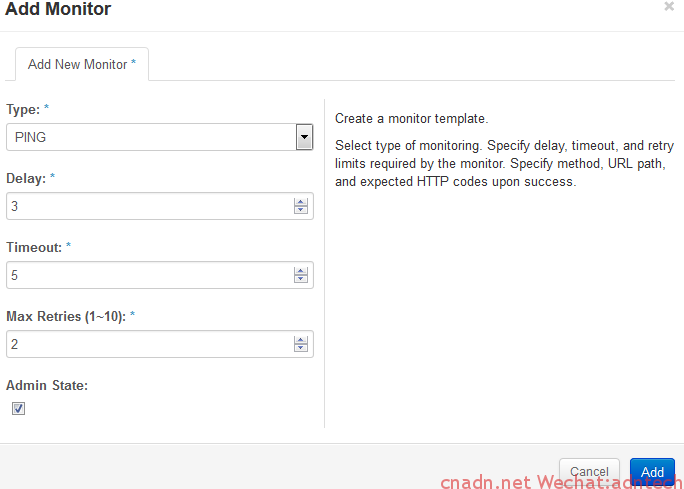
添加一个monitor:
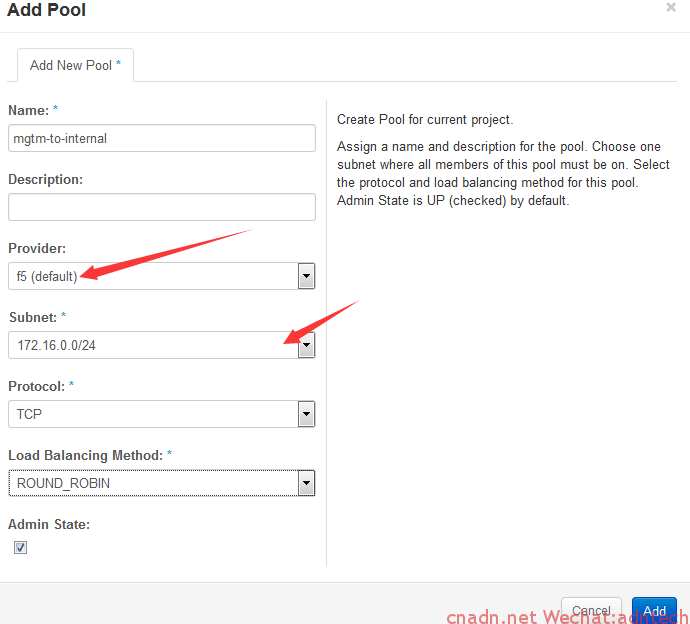
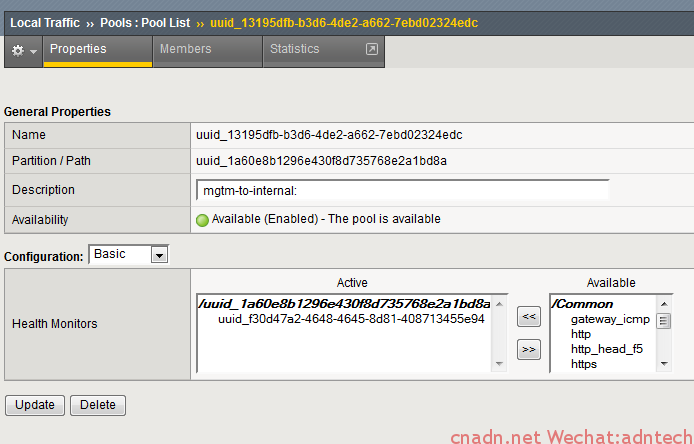
然后回到pools标签下,为pool关联monitor并为pool分配一个vip。
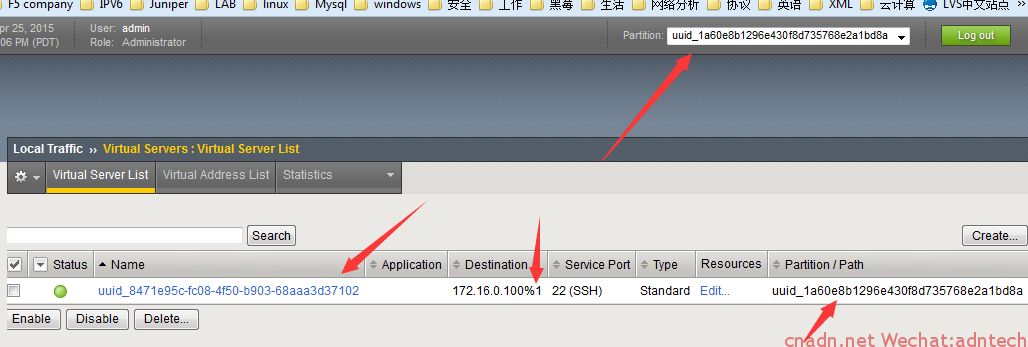
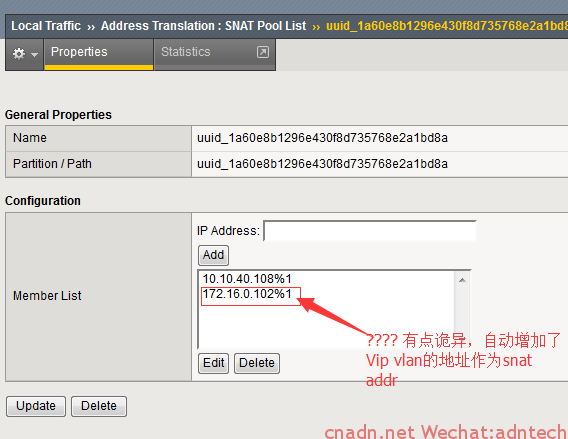
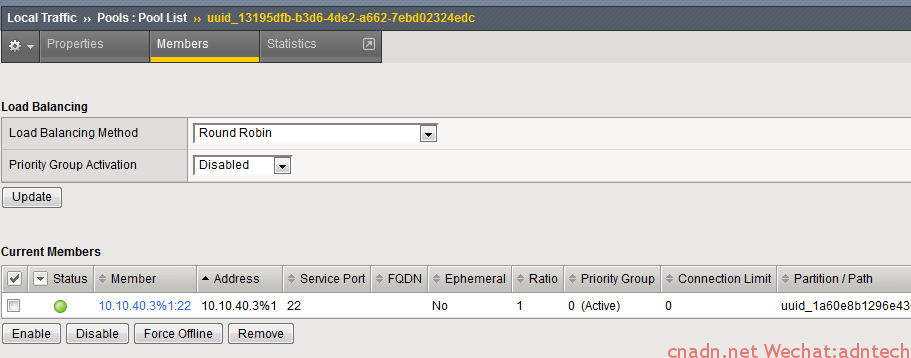
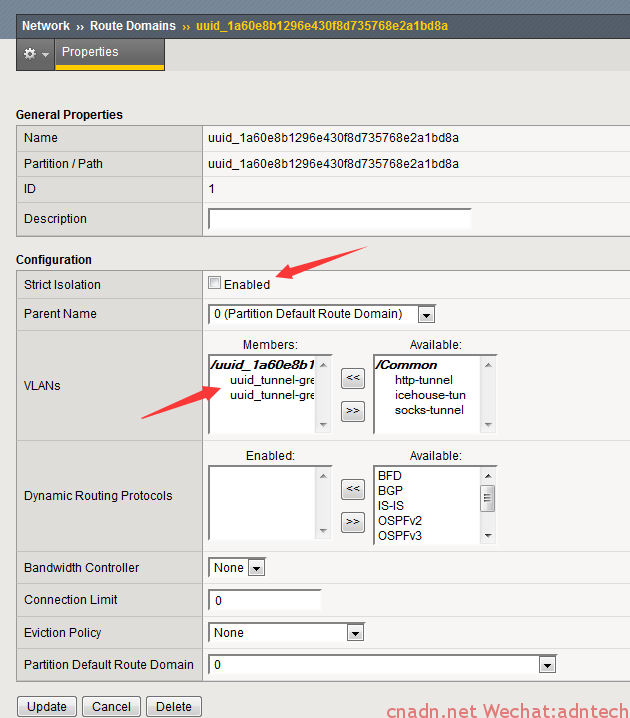
操作完毕后,F5上将自动生成以下配置:
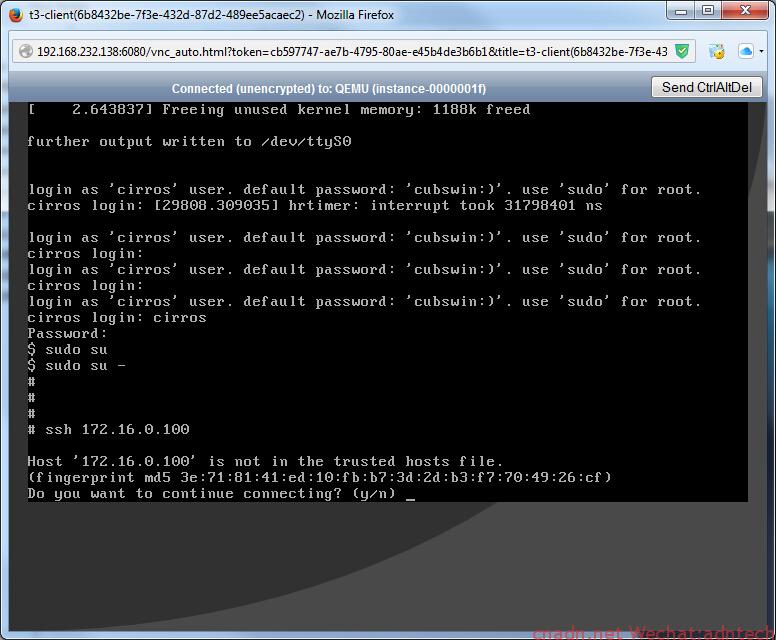
测试,ssh vip地址,可以连通:
其实在一个真正业务环境中这里需要注意MTU问题,因为网络使用了GRE 封装,内部的虚机在MTU应该对应调小,由于ssh包比较小,不调也没问题,如果发现ping ssh都可以,可是http等访问就是不行,你要考虑调小虚机的MTU。
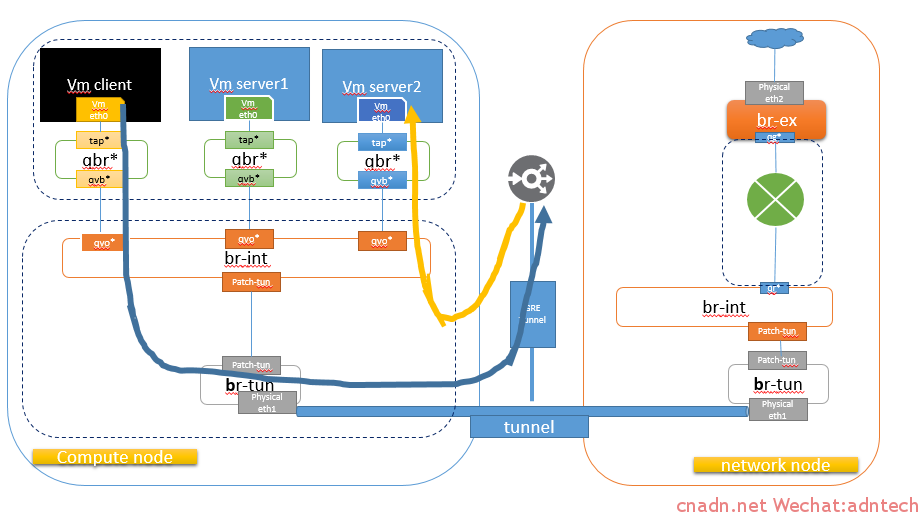
最后这种环境下的数据path如下:
预告,后续将测试:
外部F5,租户间 LB情形
openstack与BIGIQ协作系列



文章评论